Archive for the ‘Thermomix’ Category

Thermomix bread

May 26, 2014

Although this is not a cooking blog and in no way would I call myself a cook, it always surprises me that the post that receives the most search hits is the one on Thermomix ice cream.

I guess that’s a tribute to the popularity and interest in what has been for me, a huge asset to my kitchen exploits:

So here’s another to add to the collection. I made bread today—in the Thermomix—and it never fails.

Right. This is my basic recipe:

100 gm bread wheat (I buy this in a 5 kg bag from a local health food shop)
400 gm bread wheat flour (Wallaby Brand Baker’s Flour from the supermarket—it has to be bread flour)
450 ml water (gm if you want to weigh it…same diff)
3 tsp dried yeast
2 tsp salt
2 tsp bread improver (from the supermarket)

That’s the basics. What you add next is up to you. I add one tablespoon of each of the following:

Full cream milk powder
Linseed
Sesame seed
Sunflower seed
Wheat germ
LSA mix (linseed/sunflower/almond. I grind my own—in the Thermomix)
Oat bran
Dried pumpkin (I make my own)

I’ll often add anything else I have, or fancy, for example, some dried nettle, caraway seed, amaranth seed or whatever, generally only teaspoonfuls of these.

Note that the correct amount of total flour for this recipe is 500 gm; 400 gm baker’s flour + 100 gm ground wheat = 500 gm. Sometimes I’ll substitute the 100 gm of ground wheat with ground spelt grain, or spelt flour, or amaranth flour. Haven’t tried rye flour yet, but will, one day.

So. Into the TM bowl goes the wheat:

IMG_2514

One minute on speed 9 and there’s wholemeal wheat flour:

IMG_2515

Add the water and the yeast and stir on speed 1 for 5 mins at 37 C.

Add the rest of the ingredients (see extra notes at the end) and mix to combine, 2 seconds on speed 7:

IMG_2517

Set the dial to the closed lid position and knead 6 minutes on interval speed (sorry, non-TM owners…this is just TM-speak):

IMG_2518

Upend the bowl onto a floured bench and tip out the dough. You’ll need to remove the base and push the blades out, then extricate them from the dough:

IMG_2519

IMG_2520

It’s not hard…the dough is quite stretchy:

IMG_2521

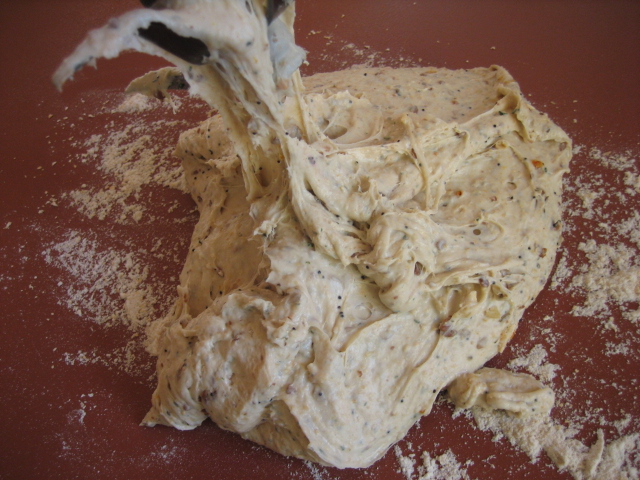
I like the tactile experience of kneading bread, so I always give it a few turns by hand at this point, so I can gauge the strength of the dough:

IMG_2522

Into the tin, light spray with water and sprinkle some polenta on top for a nice yellow finish:

IMG_2523

Cover with a dampish teatowel and into the Excalibur dehydrator at 40 C to rise:

IMG_2524

Allow to rise just to the top of the tin, and into the oven at 180 C for 30 minutes:

IMG_2526

Ta-Da!

IMG_2527

Another Thermomix success story!

I slice it thickly, with an electric knife (does a nice neat job) and freeze in packs of 4-5 slices. One slice with breakfast. It’s so nice, I’m having just butter on it at the moment.

Extra notes:

I prepare 2 or 3 batches of the basic mix (minus wheat and yeast), beforehand and store them in the fridge. That way I’m ready to go at a moment’s notice:

IMG_2516

I grease the tin with olive oil. I used to use a pastry brush to brush it on. I hate spray cans, but I bought one of olive oil just for the bread. It’s much easier and quicker to apply.


Despite the heat

February 2, 2014

The Satsuma plum produced a huge crop of fruit last year.

They were green… and the birds ignored them.

They started to colour up…and the birds still ignored them.

I picked a few…they still weren’t ripe.

I couldn’t get a net over the whole tree, so wound it through the branches as best as I could, hoping the swathes of white would deter them…and still the birds left them alone.

We were going to be hit with a week of temperatures in the high 30’s and mid 40’s, so I had to pick them all; otherwise they’d cook on the tree:

heat 004

What to do with a bucket and a half of plums! I Googled, ‘plums thermomix’.

Came up with plum chutney and chinese plum sauce.

I made the chutney:

chutney

There’s also 2 jars of bread & butter cucumbers and some of the  strawberries that are bearing now. The chutney was very good; I’d recommend it. I gave some plums to a friend and she made the plum sauce, but we both thought the chutney was the best.

So, despite the heat and the frizzled plants, I managed to get something of use from the garden.

Freezing tomatoes for winter use

August 23, 2013

I deliberately grow many more tomatoes than I can possibly eat during the growing season. The quickest way to deal with them is to throw them whole into the freezer. When frozen, they clack about like cricket balls. Last season I finished up with four large plastic boxes full and now have two left. Number three was taken out last week and turned into a batch of spicy tomato and red lentil soup (Thermomix style):

tomatoes 004

There was more than enough for the batch of soup so I turned the remainder into puree. I’ve written here about how I leave them to defrost on the bench overnight and then tip off the water that’s expelled, so the puree doesn’t need so much cooking to reduce it. I put the puree back into the freezer in 400 gm lots which is the size of a can of tomatoes, so one lot fits most recipes. It works well. For making the soup though, I left them as is and just chopped them in their frozen state in the Thermomix.

Of course, they’re no good as fresh tomatoes (which I never buy at any time of the year), but there are endless uses for cooked tomatoes and freezing them whole is a quick way of dealing with an excess that can be dealt with when there’s more time.

Thermomix hamburgers

March 27, 2013

I like to make my own hamburgers because then I know what’s in them. No sawdust or possum!

It can be done in a food processor, but naturally I use the Thermomix.

What you’ll need (although apart from the meat, it’s pretty much up to you):

sunday 004

About 500 g beef mince (I buy King Island mince because it’s pasture-fed)
Some greenery (I’ve used parsley and nettle here—did you know nettles have 8 times more iron than beef?)
An egg
Large onion or a couple of small ones
Some garlic (quantity up to you)
Some herbs (I’ve used zaatar this time—a sort of stronger version of oregano. I’m told it’s used in Lebanese cooking)
Tomato puree or tomato relish
Anything else you fancy (that’s dried pumpkin in the photo)
Salt, pepper, whatever (I used dried flakes of Mountain Pepper (Tasmannia lanceolata), because I’m growing it.

Put the greenery, etc, onions and garlic into the Thermomix and chop a couple of seconds. Speed 6-7 will do:

sunday 007

Add the egg, the mince and some tomato puree/relish and give it all a gentle stir. If it looks a bit on the wet side add some LSA* mix to dry it off. I added it anyway, for extra goodness.

Set the dial to closed lid position and knead the mixture for 3-4 minutes on interval speed. Check the consistency and add more LSA or puree as needed.

Tip it all out onto the bench or your Thermomat and divide into roughly 12 portions:

sunday

Now get hold of a large tray that will take a dozen hamburgers and sprinkle some seeds or similar stuff over it. I used sesame seeds, oat bran and some dukkah (also made in the Thermomix):

sunday 008

Now here’s the nifty bit. Use egg rings to form the burgers. Put a dollop of mince in each ring and flatten with a spatula. When you’ve done the lot (and removed the rings) sprinkle more of the mixture over their tops:

sunday 010

Voila!

sunday 011

The tray goes into the freezer and when they’re frozen, pack them away in a container. It’s much easier to do this when they’re frozen.

*LSA = linseed, sunflower seed & almond mix. You can buy it already ground, but I make my own in the Thermomix (linseed 50 g; sunflower seed 33 g; almonds 17 g and chop to desired texture).

Growing seeds for sprouting

January 17, 2013

Sprouted seeds are one of the most nutritious foods we can eat and they’re so easy to produce. Isabell Shipard’s book, How can I grow and use sprouts as living food? covers over 100 kinds of sprouting seeds and is a reference well worth having:

thursday 013
I use fenugreek seeds pretty much exclusively for sprouting. I have tried wheat, but I like the nutty, slightly curryish flavour of fenugreek best. I throw a handful into any dish—omelets, sandwiches, salads, garnish on soup, etc. I sprout about a teaspoon of dry seed a week and that keeps me going.

So, of course, a few years ago, I tried growing fenugreek. It’s so easy; germinates in a few days when sown in autumn; grows through the winter; flowers in spring and sets seed in long curved pods. It’s relatively easy to strip the pods from the plants when they’re dry, but fiddly and time-consuming to get the seeds out of the pods. Last year I discovered the Thermomix is ideal for extracting seed from pods.

Empty pods:

thursday 004

Seeds:

thursday 007

Sprouts:

thursday 003

I got about a dozen teaspoonfuls of seed from plants in a circular area 80 cm in diameter, about half a square metre in area. That’s about 3 months supply for sprouting. So in just a couple of square metres, I could grow a year’s supply. Well worth doing, particularly as the health food shop where I used to buy the seeds has since closed and (apart from buying in bulk from seed suppliers) there’s nowhere else locally I can get them.

More Thermomix ice-cream

December 17, 2012

It’s funny that this is primarily a blog about growing food (I couldn’t possibly claim to being any sort of a cook), yet the post that gets the most hits and searches is this one on Thermomix ice-cream.

With summer coming on I thought it was time to make another batch. This is ‘real’ ice-cream, not the wishy-washy el cheapo supermarket stuff, so it has to be savoured and not golluped down in haste and without thought.

In the supermarket, I’d forgotten how much cream to buy for a batch and ended up buying 3 x 200 ml cartons; enough for 2 batches and then some (a dollop in my next few cups of coffee!). I get Bulla pure cream, 45% milk fat, not a brand with thickeners or stabilisers. This is where I disregard my cholesterol levels!

So I thought I’d make one batch of vanilla and one of chocolate, but instead of using straight cocoa powder for the chocolate as per the recipe, I decided to use Thermomix milo powder.

Thermomix milo powder is a blend of nuts and cocoa and is meant to be a Milo look- & taste-alike.

It goes like this:

Milo powder

3 tbsp linseed
2 tbsp sesame seed
2 tbsp sunflower seed
2 tbsp pepitas
1/2 cup almonds
1/4 cup brazil nuts
1/4 cup cashews
1/4 cup pecans
1 cup cocoa powder

In the Thermomix:

Chop 5-10 seconds on speed 9 to a medium-coarse powder.

Now I’ll say right away that as a Milo (milk drink) substitute it fails miserably. That’s because none of the ingredients actually dissolves in the milk. They’re all insoluble, so you’re going to end up with a sludge at the bottom of the cup, albeit a healthy one.

What it is good for, is Thermomix milo biscuits.

Like this:

Milo Biscuits

125 g butter, cubed
200 g sugar
140 g self-raising flour (wholemeal if desired)
50 g milo powder
1 egg

Pre-heat oven to 160º C

Cream butter and sugar 30 seconds on speed 5.

Add egg, flour and milo. Mix 10 seconds on speed 5 to combine.

Set the dial to closed lid position and knead 20 seconds on interval speed.

Roll into balls and place on a tray (about 2.5 cm/1” diameter—they spread).

Bake 10-15 minutes or until slightly browned.

As I said, I’m not a cook, but these go down a treat with visitors:

milo 002

OK, back to the ice cream. The recipe is at the link above.

Since it’s so rich and not something to pig out on (!), I decided to ration my servings by freezing it in individual 100 ml containers. One batch makes 6 of these:

wed
I’d class this as gourmet ice cream, so I checked out the price of the most expensive brands in the supermarket.

One brand cost $9 per kgm. It didn’t have any hint of egg and still had gums, glucose syrup and artificial colours and flavours like the cheap brands. It seems that if you put it in a black container and call it ‘gourmet’, you can charge what you like! The ultimate was Maggie Beer brand—Burnt fig (who’d want to burn a fig?), Honeycomb & Caramel—at $18 per kgm. Not for anyone on a budget!

Thermomix ice-cream costed out for me at just under $8 per kgm and that included eggs at $4 per dozen which is what I used to pay at the free-range egg farm at the end of our street, before I got my three Barnevelder Girls and a dozen beautiful, fresh eggs a week.

Still cheap at twice the price and I could add any amount of burnt figs.

Dehydrated pumpkin

November 7, 2012

I read this post at Not Something Else blog and thought, “now that’s interesting”. I have a dehydrator,  and hadn’t thought of drying pumpkin before.

At first I thought, “why bother?” Pumpkins store pretty well and if there’s been a good harvest it’s possible to have pumpkin to eat right through the winter.

Then I thought of those times when I’ve had a poor harvest (pretty often, unfortunately), and have been given a monster pumpkin by a neighbour, and once it’s cut into, there’s a fair chance it will go to god before I can eat it all — buckets of pumpkin soup and lavish plates of roast pumpkin nothwithstanding.

So I thought I’d have a go at drying some pumpkin.

Not Something Else roasted his pumpkin first, then mashed it, spread it on the dehydrator tray and in the end had a lot of trouble with the dried product sticking to the tray. I watched the video he linked to and wasn’t impressed with the greyish-looking product the woman in the video produced.

I didn’t want to go down that path and thought of the Thermomix (when am I not thinking of what I can do in it!)

I peeled and cubed a small amount for starters (a quarter of a small Butternut), and gave it 5 seconds at speed 5 in the Thermie. Nicely chopped. Put it in the dehydrator on a piece of baking paper over the top of my tray, because the basic frame of my trays is covered with a piece of perforated plastic. It took a few hours to dry at a temperature of about 40º C (I had a batch of yoghurt curing in there at the same time, so couldn’t increase the temp).

It dried pretty well and didn’t stick to the paper. Some of it had stuck together in lumps so I put it all back into the Thermomix and gave it a few seconds to free it all up and make it more friable.

The dried mix contained some coarse pieces and some fines. I sieved it through a couple of sieves and ended up with three particle sizes:

Next day, I finished off the rest of the Butternut and also did a piece of Jap that had been in the fridge for a while. Here’s the Jap just going into the dryer. It was a coarser chop than the butternut, even though it was chopped for the same speed and time. Lovely colour!:

The dried Jap pieces didn’t stick together as much as the Butternut; I think the coarser chop was the reason.  And I think the reason why I got a range of particle sizes with the Butternut was that it chopped much finer than the Jap initially and putting it back into the Thermomix to break up the dried pieces ground some of it to smaller particles. I didn’t need to sieve the Jap pieces because there were no visible fines.  Probably, it’s all something to do with the different textures of the pumpkin flesh.

Now I have some dried pumpkin. What next?

Well, I’m going to put a couple of tablespoonfuls into my next loaf of bread. Should give it an interesting colour. I’m thinking of a batch of biscuits using the very fine stuff. Savoury or sweet, I think the pumpkin will complement them. It can also be used in casseroles as a thickener — there are loads of possibilities. Of course, the Thermomix will reduce dried particles of any size to a powder, so it doesn’t matter what the initial chop is like, just that smaller pieces will dry more quickly.

Nettle pesto

October 29, 2012

My new little edible weed book arrived a couple of days ago:

It’s a great resource and conveniently pocket-sized. I’m even more enthused about maintaining a collection of edible ‘weeds’ somewhere in a corner of the food forest.  Going to need an alternative name to ‘weeds’ though, to eliminate the negative connotations.

I have a large, healthy patch of nettles growing at the moment so I was interested in the nettle entry. There’s a recipe for nettle gnocci in the recipe section at the back of the book and nettle pesto was mentioned, so today I got to and made a batch, using my normal basil pesto recipe:

I’m not sure about the taste; it’s very ‘green’ (a bit like eating your lawn), and not a patch on basil pesto, but I’ll try it on some pasta later in the week and see how it goes. Definitely won’t throw it out though, with all that goodness in the nettles it’s too valuable to waste. I might try the gnocci at some stage and nettle and potato soup which I made some years ago, is a winner, too.

My pesto recipe:

2 cups basil (or nettle) leaves
1/2 cup olive oil
1/4 cup pine nuts or almonds
2 cloves garlic
1/2 tsp salt
1/2 cup grated parmesan

Blend all except the parmesan in a food processor until the desired consistency and then stir in the cheese. Of course, it’s a doddle in the Thermomix and it will even grate the parmesan for you.

I picked a huge basket of nettle leaves, so what I didn’t use will be dried and ground into flakes to use in omelets, casseroles, soups, you name it, etc.  Nettles are extraordinarily rich in minerals, with 8 times more iron than beef, lots of calcium and up to 40% by dry weight of protein.

Freezing tomatoes & making relish

August 9, 2012

Following a comment from a reader about drying tomatoes, I replied that I usually dry cherry tomatoes and freeze all the others.

Cherry tomatoes are easy to dry, out in the hot sun, on a wire screen. Like this:

At temperatures over 30º C, they’ll dry in a couple of days and I prefer this way since it saves power. If there’s an intervening cool snap and they’re not dry, I put them in the dehydrator to finish them off:

The larger tomatoes take longer to dry and it’s easier to freeze them. Once they’re frozen they clack together like so many cricket balls. I freeze them in a single layer on a tray and once they’re hard, transfer them to plastic bags or a large plastic tub at the bottom of the freezer. Throughout the year I use them to make pasta sauce or tomato relish or any other tomato product.

Since I just had an interesting experience with the frozen ones, I thought I’d pass on what happened.

I wanted to make another batch of tomato relish. I love it. So much so, that I’d just about put it on ice cream (I’ve put the recipe below; needless to say, I make it in the Thermomix now).

I took out a kilo of tomatoes from the freezer and put them in a bowl on the bench. Normally I’d chop them up straight away and use them as is. Something more important came up and I didn’t get round to doing it that day, so the bowl of tomatoes sat on the bench overnight.

Next morning, there was a bowl of saggy red bags sitting in a sea of clear liquid. It had just a slight tomatoey tang and taste. I realised that probably most of the nutrients, flavour, and certainly all the colour, were intact and all I’d lost was most of the water, as the cells damaged by freezing thawed and released it. I tipped the water off.

What it meant was that I wouldn’t have to cook the mixture as long to get to the desired consistency and that would preserve more of the colour and nutrients. It took only 2/3 as long as the previous batch I’d made, in which the tomatoes hadn’t been defrosted overnight.

I was delighted. Now I have a whole new way to use frozen tomatoes with much less cooking.

OK, here’s the recipe. It’s written for cooking in the Thermomix, hence the references to times, speeds and temperatures, so you poor deprived people without one  😦  will have to do all your chopping in a food processor and your cooking on the stove. Note that ‘ripe tomatoes’ means fresh tomatoes, so you’re going to have all that extra water to cook off. If you do use frozen tomatoes, use the same weight as fresh tomatoes and pour off the liquid after defrosting.

Tomato Relish

800 g ripe tomatoes
300 g onions
1 tsp salt
300 g sugar
40 ml Wild’s Ezy Sauce (available in most supermarkets)
2 tsp mustard powder
2 tsp curry powder
20 g plain flour

Place onions and tomatoes in bowl. Chop  5 seconds on speed 6.

Add rest of ingredients and cook 40 minutes at 100º C on speed soft or 1.

Check consistency and if necessary cook a further 10-20 minutes.

Bottle into pre-heated jars and enjoy (on ice-cream, if you want).

Rainy Wednesday

August 8, 2012

I know God hates me because I’m an atheist and when he sees me out in the garden, he sends it down.

He must have been otherwise occupied this morning because I actually got a lot of weeding done before he woke up that I was out there.

I had a coffee while I caught up on other blogs and (for me) had a stunning idea.

I’ll go shopping.

Wait a minute! I hate shopping! And I hate to drive in the rain (to be fair to God, though, it wasn’t heavy).

Friday is my usual food shopping day. I go to a small local centre where there’s a supermarket, PO, newsagent, bank, hot bread shop, butcher and a chemist. It’s about a 12 km return trip. My record for getting there, getting the groceries and getting home is 40 minutes. Not bad for an anti-shopper (and without speeding).

There’s a bigger shopping centre about twice that distance away, where I only go when I want something they have that the small centre doesn’t.

I’d almost run out of chicken stock and there’s a chicken place there that sells 3 chicken carcases for a dollar. Can’t get better value than that.

There’s also an el cheapo bookshop where everything’s $5 and an el cheapo greengrocer (although I prefer to shop for fruit & veggies at a Sunday market where the stuff is local).

So, later…..

Three chicken carcases in the stockpot (note: rainwater only, don’t want toxic fluoride in my system):

Two books, one on beekeeping (I will, one day) and a risotto recipe book. Since I made the mushroom risotto so easily in the Thermomix, I’m sold on risottos:


A couple of leeks, a dollar each (better than I can get at the Sunday Market):


They were destined for the dehydrator:

Five litres of delicious chicken stock. I can’t understand why anyone would want to buy the dishwatery stuff in a carton:

So not a bad outcome, eh God? Can’t keep a good atheist down, even on a rainy day!